Tuesday, 23 December 2008
Quilting a corset anyone?
I found this kicking around my documents files earlier today and I thought I'd post it up in case anyone's interested. As one of my other 'hats' I'm a corsetiere and having done many a search on corset making I know there's not a lot online about it. So I thought I'd document what steps I use when I make mine.
This corset is for my niece and the slightly straighter line of this corset will suit her better as the standard corset I made for her had to be pinned up rather a LOT. It's an adaption of this corset..
 (Clickie for larger)
I'm making it in pink silk over coutil and lined with baby pink cotton. The side panels are going to be quilted because I think that's going to give a lovely effect with the colour of the silk and I am intending to do some cording on the front (just cause I like doing it!!) but I may have to adapt it slightly as I'm making the corset closed front (ie - without a busk in it).
So.... starting with the quilting. I've cut all my materials out in a large enough rectangle that I can later on pin my pattern piece on the top and cut it out. (for this corset that's about 8" width by 17" height). Now I have a few layers to consider.....
 (Clickie for larger)
We have a top fabric layer of the pink silk, which has been backed with WOVEN iron on interfacing stuff / fabric. This is to stop the top fabric ripping away under the casings. These things come under lots of pressure when they're worn so it's a step I don't skip on.
Next layer is the coutil layer. Coutil is the traditional corsetry fabric that provides the strength in a corset. It's very densely woven and usually has a sort of herringbone weave in it. It's expensive yes (anything from around £8 a metre upwards.) but it's not worth skimping on. Coutil is THE fabric to do this with, even if you're using a fashion fabric over the top!! It's the only thing that has the strength to hold up through multiple wearings and personally I wouldn't want to put the time and effort into a corset only to have the seams giving out on me after a couple of wearings!
Under the coutil we have a layer of volume fleece. Don't worry, this is only for the quilted panel, not all of the corset, so it's not going to end up bulky.
Under the volume fleece we have a layer of corset lining fabric. This only comes in the off-white / cream colour and although I'm lining the rest of the corset in pink cotton, I decided to use up a scrap of this I have left because it's so nice to work with.
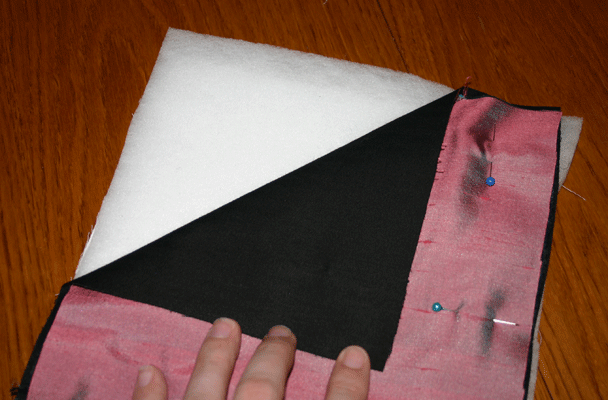
Ok moving on, I've stacked all my fabrics on top of one another with Lining fabric at the bottom, then volume fleece above it, then coutil, then finally top fabric and then pinned them all together ready for quilting.
 (clickie for larger)
At this point any real quilters reading this are probably wincing in pain. Sorry, I'm not a quilter and this way works for me! ;)
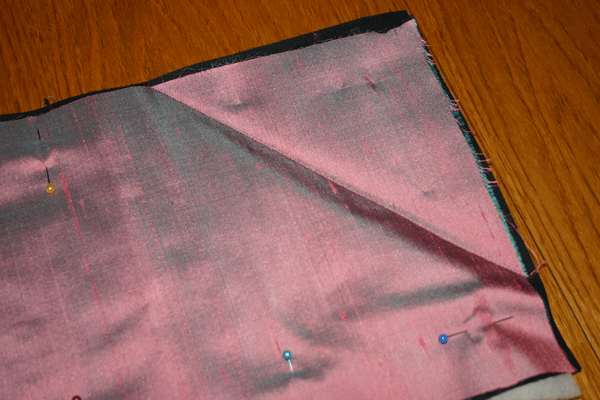
So, now I need to start quilting. I'm going to use a fairly traditional quilting design in corsetry with vertical lines crossed by diagonals. So first I need to work out my diagonal line. I do this by folding down a corner of my top and coutil fabrics like so....
 (clickie for larger)
... and making a crease. It's easier if you fold BOTH top fabric and coutil down together as coutil takes the crease well. Then, I just run a line of stitching down the crease in the fabric as so...
 (clickie for larger)
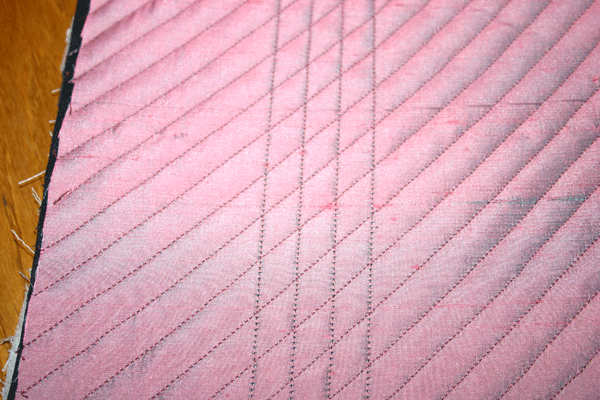
Now.... here comes the snazzy bit! Move your fabric along a bit until the line of stitching you just made sits at the right side of the presser foot like so...
 (clickie for larger)
... And stitch another line!! Basically keep going until you've filled your fabric with lines. Obviously when you're done you're gonna need to turn your fabric around and just do a few lines to fill that top triangle as well. Fun huh?
Now, it should be noted here that I'm actually using a modern machine to do this. Usually I favour older Singer Machines and when I say older I MEAN older, pre 1950's. Most of my corsets are done on an old Singer 201k heavy duty machine.
I did start making corsets on a modern domestic machine but be warned corsetry EATS machines... I had to replace two before I got my 201. So unless you wanna fork out lots of cash (probably about £400 minimum for a machine that's up to standard) I'd have a look on ebay for an older singer or something.
In my experience the 201k's are fantastic (and you can even get those with electric ;) ) or possibly the slightly smaller 185k or even 99k. Dunno, they're cheap enough to pick up and metal geared so heavy enough to cope. You may find you get on with them and if so, you saved yourself 400 quid. But BE warned, these machines are straight stitch machines. No jig-jag, nothing fancy, some don't even do back-stitch (well 201's do, mine does anyway).
Anyway I digress, the REASON I'm using a modern machine here is because I'm using the width of the presser foot to measure my quilting lines. Modern machines seem to have wider presser feet than the old singers and although I DO have a quilting guide for the 201... well, it's of the impression equal distance between each line is an optional extra. Which is cute, gives the machine character but not so good when doing quilting. Since I'm only dealing with one layer of coutil here, I'm ok with using the modern machine as it shouldn't get eaten with just one layer. I hope.
So, one I've filled my rectangle with diagonal lines, I do the straight lines down the fabric....
 (clickie for larger)
.. now I would have carried on but my bobbin ran out at this point, the baby was shouting for dinner and my hubby was snoring on the sofa so the chances of HIM getting up and doing it were like a cat in Crufts. (Bless him, he's ill atm so I forgive him) But yeah, that's the reason for only four lines there ... but it's enough to give an indication!
This corset is for my niece and the slightly straighter line of this corset will suit her better as the standard corset I made for her had to be pinned up rather a LOT. It's an adaption of this corset..
(Clickie for larger)I'm making it in pink silk over coutil and lined with baby pink cotton. The side panels are going to be quilted because I think that's going to give a lovely effect with the colour of the silk and I am intending to do some cording on the front (just cause I like doing it!!) but I may have to adapt it slightly as I'm making the corset closed front (ie - without a busk in it).
So.... starting with the quilting. I've cut all my materials out in a large enough rectangle that I can later on pin my pattern piece on the top and cut it out. (for this corset that's about 8" width by 17" height). Now I have a few layers to consider.....
(Clickie for larger)We have a top fabric layer of the pink silk, which has been backed with WOVEN iron on interfacing stuff / fabric. This is to stop the top fabric ripping away under the casings. These things come under lots of pressure when they're worn so it's a step I don't skip on.
Next layer is the coutil layer. Coutil is the traditional corsetry fabric that provides the strength in a corset. It's very densely woven and usually has a sort of herringbone weave in it. It's expensive yes (anything from around £8 a metre upwards.) but it's not worth skimping on. Coutil is THE fabric to do this with, even if you're using a fashion fabric over the top!! It's the only thing that has the strength to hold up through multiple wearings and personally I wouldn't want to put the time and effort into a corset only to have the seams giving out on me after a couple of wearings!
Under the coutil we have a layer of volume fleece. Don't worry, this is only for the quilted panel, not all of the corset, so it's not going to end up bulky.
Under the volume fleece we have a layer of corset lining fabric. This only comes in the off-white / cream colour and although I'm lining the rest of the corset in pink cotton, I decided to use up a scrap of this I have left because it's so nice to work with.
Ok moving on, I've stacked all my fabrics on top of one another with Lining fabric at the bottom, then volume fleece above it, then coutil, then finally top fabric and then pinned them all together ready for quilting.
(clickie for larger)At this point any real quilters reading this are probably wincing in pain. Sorry, I'm not a quilter and this way works for me! ;)
So, now I need to start quilting. I'm going to use a fairly traditional quilting design in corsetry with vertical lines crossed by diagonals. So first I need to work out my diagonal line. I do this by folding down a corner of my top and coutil fabrics like so....
(clickie for larger)... and making a crease. It's easier if you fold BOTH top fabric and coutil down together as coutil takes the crease well. Then, I just run a line of stitching down the crease in the fabric as so...
(clickie for larger)Now.... here comes the snazzy bit! Move your fabric along a bit until the line of stitching you just made sits at the right side of the presser foot like so...
(clickie for larger)... And stitch another line!! Basically keep going until you've filled your fabric with lines. Obviously when you're done you're gonna need to turn your fabric around and just do a few lines to fill that top triangle as well. Fun huh?
Now, it should be noted here that I'm actually using a modern machine to do this. Usually I favour older Singer Machines and when I say older I MEAN older, pre 1950's. Most of my corsets are done on an old Singer 201k heavy duty machine.
I did start making corsets on a modern domestic machine but be warned corsetry EATS machines... I had to replace two before I got my 201. So unless you wanna fork out lots of cash (probably about £400 minimum for a machine that's up to standard) I'd have a look on ebay for an older singer or something.
In my experience the 201k's are fantastic (and you can even get those with electric ;) ) or possibly the slightly smaller 185k or even 99k. Dunno, they're cheap enough to pick up and metal geared so heavy enough to cope. You may find you get on with them and if so, you saved yourself 400 quid. But BE warned, these machines are straight stitch machines. No jig-jag, nothing fancy, some don't even do back-stitch (well 201's do, mine does anyway).
Anyway I digress, the REASON I'm using a modern machine here is because I'm using the width of the presser foot to measure my quilting lines. Modern machines seem to have wider presser feet than the old singers and although I DO have a quilting guide for the 201... well, it's of the impression equal distance between each line is an optional extra. Which is cute, gives the machine character but not so good when doing quilting. Since I'm only dealing with one layer of coutil here, I'm ok with using the modern machine as it shouldn't get eaten with just one layer. I hope.
So, one I've filled my rectangle with diagonal lines, I do the straight lines down the fabric....
(clickie for larger).. now I would have carried on but my bobbin ran out at this point, the baby was shouting for dinner and my hubby was snoring on the sofa so the chances of HIM getting up and doing it were like a cat in Crufts. (Bless him, he's ill atm so I forgive him) But yeah, that's the reason for only four lines there ... but it's enough to give an indication!
Subscribe to:
Post Comments (Atom)


0 comments:
Post a Comment